How to Install Android x86 on PC Windows 10 (With or Without USB)
Android x86 enables you to run Android on your PC, making it a good solution for individuals seeking the flexibility of both Android and Windows. This post will teach you how to install Android x86 on your Windows 10 PC, with or without a USB device.
Why Install Android x86 on Your PC?
Android x86 is popular because of its lightweight design with PC hardware. Whether you’re a developer testing applications or just want to utilize Android apps on a bigger screen, this OS delivers the entire Android experience on a PC.
There are two basic methods to install Android x86 on your PC:
With a USB drive: The traditional technique is to use a bootable USB stick.
Without a USB device, you may install Android x86 straight from your hard drive.
Let’s look at two methods.
Method 1: Install Android x86 on PC with USB
Requirements:
- At least 8GB of capacity on a USB drive.
- A Windows PC with at least 2GB RAM and 4GB of free space.
- Download Android x86 ISO from the official website (https://www.android-x86.org/).
- Rufus or another bootable USB creator tool.
Step-by-Step Guide
- Download Android x86 ISO
Find the latest ISO file on the Android x86 page and download it. - Create a Bootable USB Drive
Use Rufus or any other bootable USB tool:- Insert your USB drive.
- Open Rufus and select the Android x86 ISO file.
- Select the partition method (MBR or GPT, whichever applies to your computer).
- Hit “Start” to create the bootable USB.
- Boot from USB
- Restart your PC and enter the BIOS menu by pressing the appropriate key (F2, F10, DEL, etc., depending on your system).
- Change the boot order to boot from the USB drive first.
- Save and exit the BIOS. Your PC will now boot from the USB and load the Android x86 installer.
- Install Android x86
- Out of the boot menu, pick “Install Android-x86 to hard disk.”
- Select the partition where you want to install Android (you may need to create a new partition if needed).
- Format the partition to EXT4 (Android’s preferred file system).
- Install the GRUB bootloader to allow dual-booting with Windows.
- Follow the on-screen steps to finish the download.
- Reboot and Enjoy
Once the installation is complete, reboot your PC. You will now see a boot menu where you can choose to boot either Windows or Android x86.
Also Read: How to Windows 11 ISO Download: Step-by-Step Installation Guide
Method 2: Install Android x86 on PC without USB
If you don’t have a USB drive handy, you can still install Android x86 using your PC’s hard drive. This method involves using a partition on your hard drive as the installation source.
Prerequisites
- Android x86 ISO file.
- EasyBCD (a tool for managing boot loaders).
- On your hard disk have at least 15GB Free space.
Step-by-Step Guide
- Download Android x86 ISO
Like the USB method, start by downloading the Android x86 ISO file. - Create a New Partition
- Look up “Create and format hard disk partitions” in Windows.
- Select your drive and choose “Shrink Volume” to free up at least 15GB.
- Create a new partition with the freed space and format it as FAT32 or NTFS.
- Extract Android x86 ISO
- Use 7-Zip or any file extractor to extract the contents of the ISO file directly to the newly created partition.
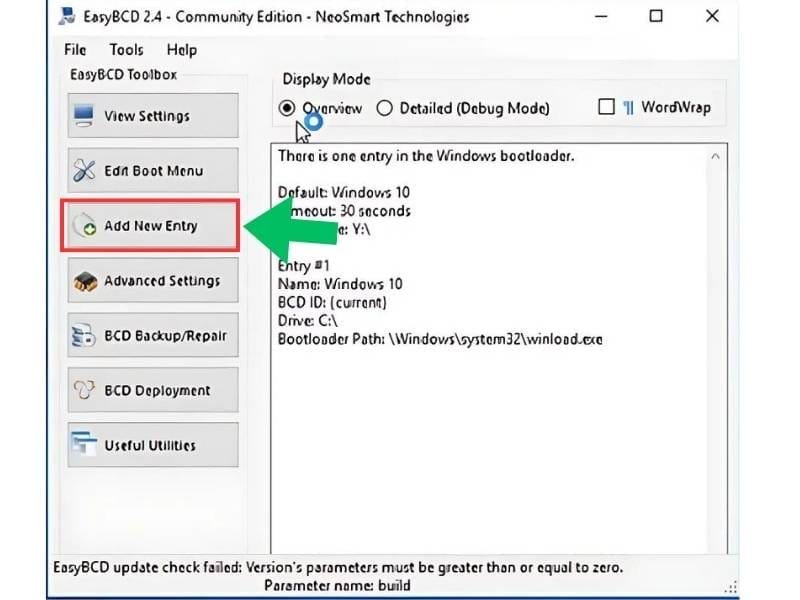
- Install EasyBCD

- Download and install EasyBCD, a boot manager tool.
- Open EasyBCD and go to the “Add New Entry” section.
- Select the “ISO” tab, browse to the Android x86 ISO file, and add it as a bootable entry.
- Boot into Android Installer
- Reboot your PC, and you’ll see Android x86 as an option in your Windows boot menu.
- Select Android x86 to boot into the installer.
- Follow the same installation process as in the USB method. Select the partition where you extracted the ISO, format it, and install Android.
- Finalize Installation
- Install the GRUB bootloader for dual booting.
- Complete the installation and reboot. Android will now appear in your boot menu, allowing you to switch between Windows and Android.
Important Tips:
- Dual Boot Issues: If you’re having trouble with dual booting (e.g., missing GRUB menu), you may need to reconfigure your boot settings using tools like Easy BCD or reinstalling the GRUB bootloader.
- Wi-Fi or Graphics Issues: After installing Android x86, you may notice that certain hardware like Wi-Fi or graphics doesn’t work as expected. Testing the OS in Live Mode before installation can help identify potential issues.
Also Read: How to Create a Bootable USB Windows 10 Using Rufus
Conclusion
Installing Android x86 on a Windows 10 PC is a fantastic way to use Android and Windows on a PC. Whether you’re going the traditional route using a USB drive or installing Android without one, this guide ensures that you’re covered from start to finish. With the ability to dual boot, you can switch between Windows and Android as needed.
If you encounter issues, don’t forget to test in Live Mode first and use tools like EasyBCD to fix boot problems. Enjoy the flexibility and power of Android on your PC!
