If you’re looking to create a bootable USB for Windows 10, you’re in the right place! In this guide, we’ll break down how to create a bootable USB using Rufus—one of the easiest and most reliable tools available. Whether you’re reinstalling Windows, repairing a corrupted system, or just need a backup, this step-by-step guide will walk you through the process. By the end, you’ll be a bootable USB pro, with everything you need to install or repair Windows 10 in your pocket.
What You’ll Learn:
- Why you need a bootable USB for Windows 10
- What Rufus is and why it’s the best tool for the job
- Step-by-step instructions to create your bootable USB
- Troubleshooting tips to fix common issues
- A comparison with other guides to show why this one is the most comprehensive
Why Do You Need a Bootable USB?
Before we dive into the technicalities, let’s answer an important question: why bother creating a bootable USB? Here are some important reasons why you need one:
- Clean Windows Installation: If your computer starts lagging or gets infected with malware, a fresh installation can give it new life.
- System Recovery: A bootable USB can help you recover your system if something goes wrong (corrupted files, system errors, etc.).
- Speed: Installing Windows from a USB is faster than using a DVD, especially on newer devices that lack optical drives.
- Portability: You can carry the bootable USB anywhere and use it on any computer that needs a fresh installation.
Now that you know why you need one, let’s talk about how to create a bootable USB using Rufus.
What is Rufus?
Rufus is a free, small program that can organize and make USB usable. People like it because it’s easy to use, quick, and reliable. Here are a few reasons why Rufus stands out:
- It’s Fast: Rufus can create bootable USBs significantly quicker than its competitors.
- Lightweight: It’s a small application that doesn’t hog system resources.
- Versatile: Rufus supports a wide range of bootable ISOs, not just Windows. Whether you need a USB for Linux, DOS, or Windows, Rufus can handle it.
- No Installation Required: Rufus is portable, meaning you can use it without installing it on your PC.
Fun Fact:
Rufus is actually named after a dog! 🐕 How cool is that? Its mascot—a dog with a USB in its mouth—brings a little personality to this handy tool.
Also Read: How to Download Windows 11 ISO File
What You’ll Need
Make sure you have these things before you start:
- A USB drive: Minimum 8GB storage recommended, as the Windows 10 ISO can be quite large.
- Windows 10 ISO file: You can download this directly from the official Microsoft website.
- Rufus: Download the latest version from rufus.ie.
Note:
All data on the USB will be erased during this process, so back up any important files before proceeding.
How to Create a Bootable USB Using Rufus
Now, let’s walk through the steps to create your bootable USB using Rufus. Ready? Let’s go!
Step 1: Download and Install Rufus
First, you’ll need to download Rufus. Head over to rufus.ie and click on the latest version under the “Download” section. It’s a small file, so it should download in seconds.
Step 2: Download the Windows 10 ISO
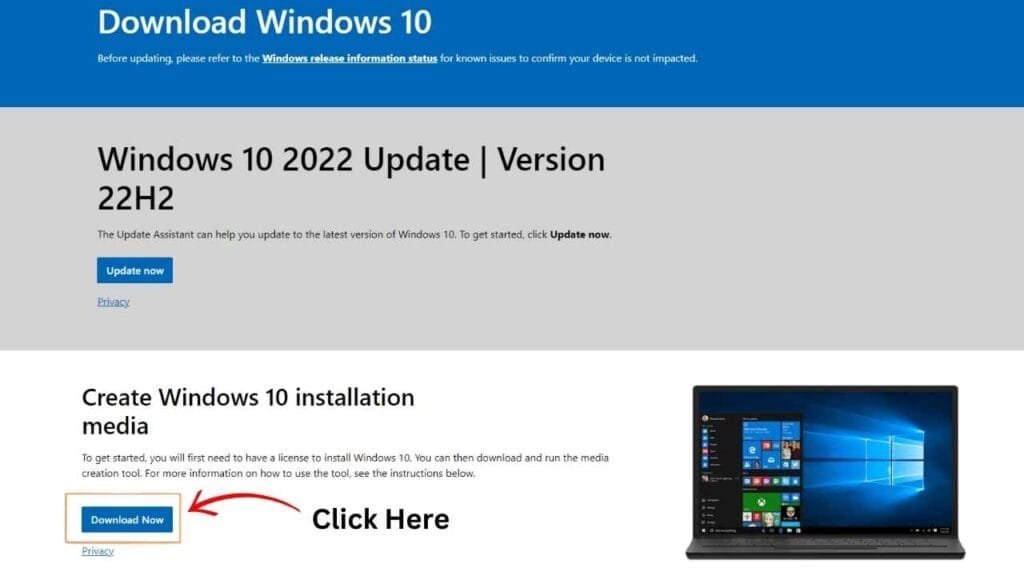
Next, you’ll need the Windows 10 ISO file. To get this, visit the official Microsoft website. Here’s how you do it:
- Scroll down to “Create Windows 10 installation media” and click on “Download tool now.”
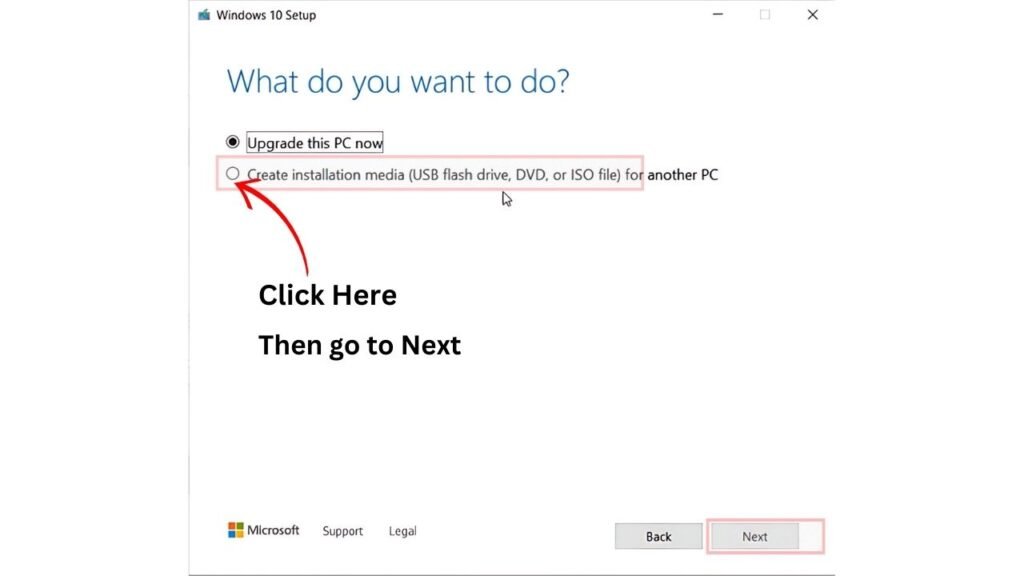
- Run the tool and select Create installation media for another PC.
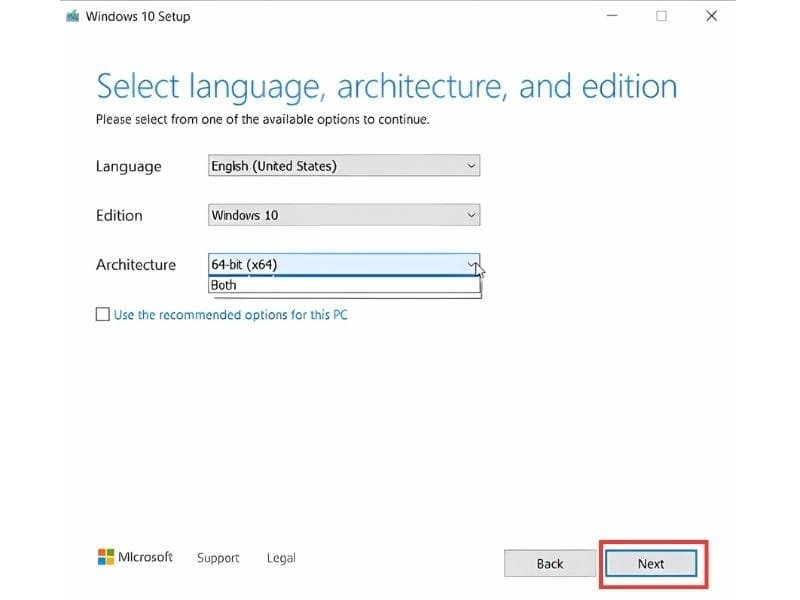
- Choose your language, edition, and architecture (32-bit or 64-bit) and then click Next.
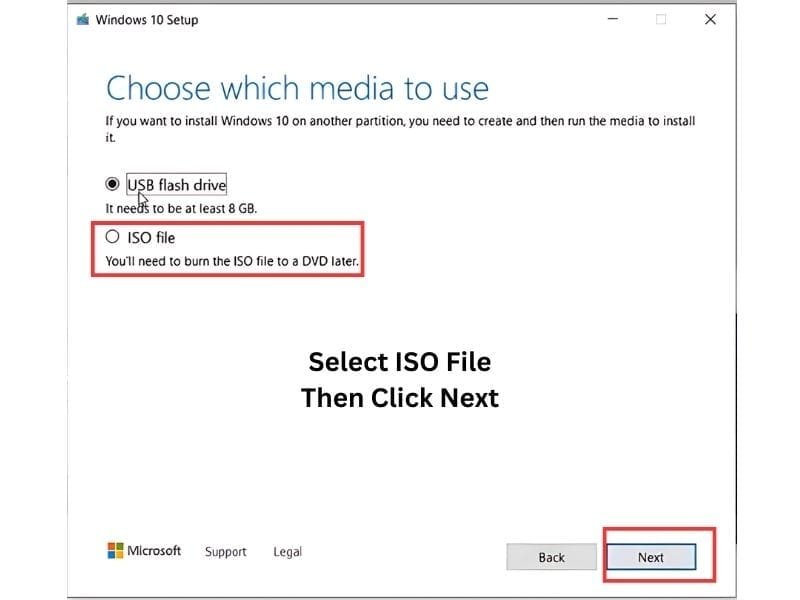
- Select “ISO file” as the download option, and save it to your computer.
Step 3: Run Rufus
Once you’ve got Rufus and the Windows 10 ISO file, it’s time to create the bootable USB:
- Connect your USB drive to your computer.
- Open Rufus (no installation required!).
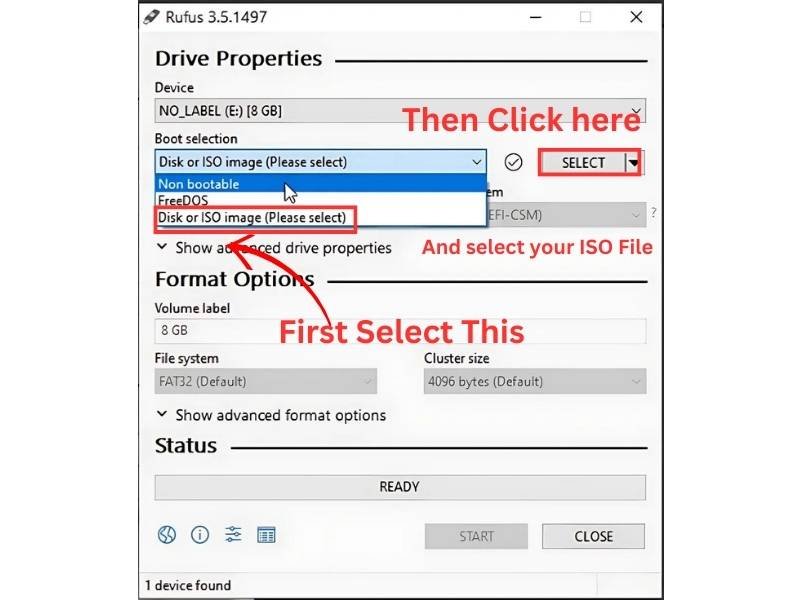
- In the Device section, choose your USB drive from the dropdown menu.
- Under Boot selection, click on the “SELECT” button and pick the Windows 10 ISO file you downloaded previously.
- Rufus will automatically detect the correct partition scheme for your device. By default, it will choose GPT if your computer uses UEFI, or MBR for older BIOS systems. If you’re unsure, leave it on the default settings.
- Leave the file system as NTFS.
- Under Volume label, you can name your USB (like “Win10_Bootable”).
- Click START to begin the process.
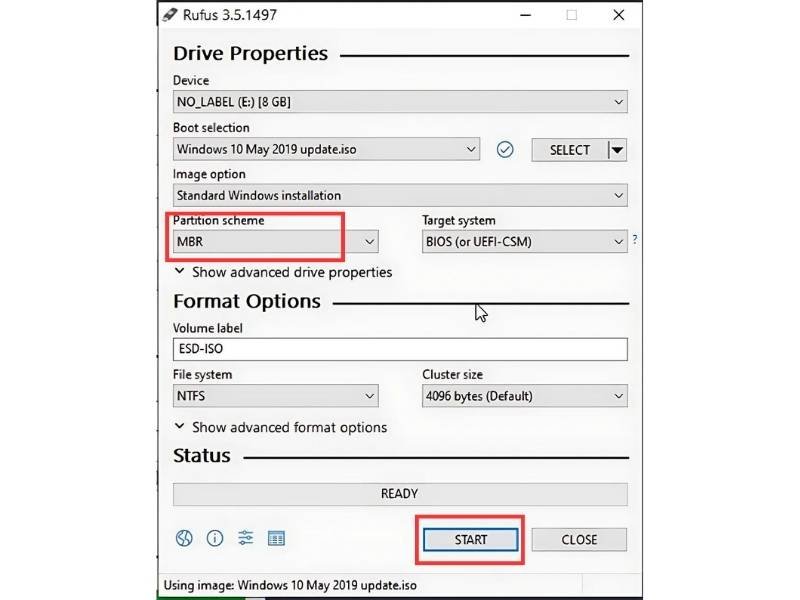
Rufus will warn you that all data on the USB will be erased. Confirm by clicking “OK.”
Step 4: Wait for Rufus to Complete
Now, you just sit back and let Rufus do its magic! Depending on your USB drive speed, the process can take anywhere from a few minutes to half an hour.
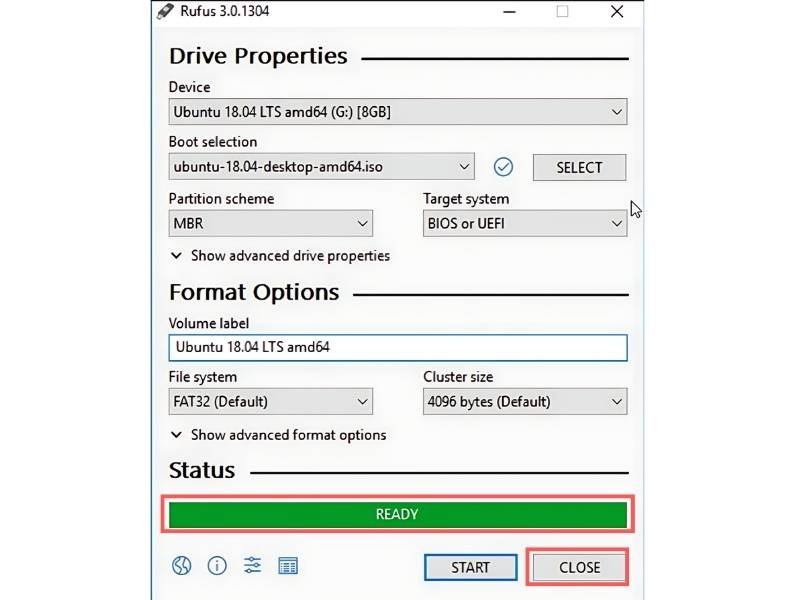
Once Rufus finishes, you’ll see a “READY” status. Congratulations! 🎉 Your bootable USB for Windows 10 is ready to use.
Step 5: Boot from Your USB
Now that you have your bootable USB, here’s how you can use it:
- Insert the USB drive into the computer you want to install Windows 10 on.
- Restart your computer and hit the key that brings you to the boot menu. Normally F2 or F12 keys are most used.
- From the boot menu, choose the USB drive.
- Follow the on-screen instructions to install Windows 10.
Troubleshooting Common Issues
USB Drive Not Showing Up in Rufus
If Rufus doesn’t detect your USB drive, try the following:
- Check the USB port: Try switching the USB drive to another port.
- Reformat your USB drive: Sometimes a corrupted USB drive can cause issues. Use a different tool to format it first, then try again.
- Try a different USB drive: If it still doesn’t show up, your USB drive might be faulty.
Can’t Boot from USB
If your computer doesn’t boot from the USB, check these:
- Secure Boot: Go into your BIOS settings and disable Secure Boot.
- BIOS/UEFI Settings: Ensure the USB drive is first in the boot order.
Slow Bootable USB Creation
If the process is slower than expected, it may be due to:
- USB speed: Older USB 2.0 drives will take much longer than USB 3.0 or higher.
- Computer performance: If your PC is slow, the process will take longer.
Final Thoughts
Creating a bootable USB using Rufus is a must-know skill for anyone looking to install or repair Windows 10. With this guide, you’ve got everything you need to get started—no confusing tech-speak, just clear, easy-to-follow instructions.
If you found this guide helpful, why not share it with friends or keep it bookmarked for future reference? The next time you need to reinstall Windows, you’ll be ready!
